Pages

.

A Tale Of Two Dinners-Meatballs & Meatloaf

You will get two good dinners from this one ground
 beef mixture. One for now and 
one for the freezer..... you choose.

Meatballs & Meatloaf

2 lbs. ground chuck
1 small Italian sausage, about 3 oz.
Place the beef in a large mixing bowl. Remove the sausage casing and add to the  bowl.
1/2 onion, cut up
1 stalk celery, cut up
1 small carrot, cut up
1 garlic clove
1/4 C parsley
2 slices white bread, torn up
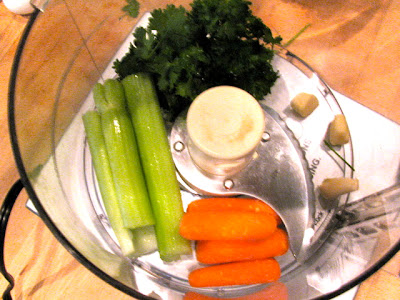
In a food processor, add the onion, celery, carrot, garlic and parsley.
Chop until small.
 Then add the torn bread pieces. 
Pulse a few times to blend in.
Add to the bowl with the meat.

1/4 C ketchup
1 C bread crumbs
1/2 C Parmesan/Romano cheese
1/2 C milk
1/2 t salt
1 egg
Add these ingredients to the bowl. Using your hands, mix until well combined.
Divide the mixture in half.
 For the meatballs, roll into 12 smooth round balls.
For the meatloaf, shape into a loaf to fit a 9x5 loaf
 pan. Wrap well and freeze.
Date with a label.
Good idea to also tape on the cooking instructions. 
To cook the meatballs: Heat a large frying pan
 until hot. Add 2 T olive oil and heat 30 seconds. 
Add the prepared meatballs and brown.  
Gently turn the meatballs, using two spoons
 until browned on all sides. 
Stir in sauce and let simmer 25-30 minutes.
You can use your favorite spaghetti sauce or 
make my sauce by adding:
 2 cloves minced garlic stirred into the pan.
then add:
1- 28oz can chopped or crushed tomatoes
1 t Italian herbs
1 t sugar
1/2 t salt
1/4 t red pepper flakes.
Tonights dinner.

Another homemade dinner waiting for you 
in the freezer for when you have no time
to cook. You'll like that! 
To cook the meatloaf
Place the thawed meatloaf in a 9x5 loaf pan, cover 
the top with 1/4 C ketchup and bake @350 for 1 hour.

Enjoy!


reade more... Résuméabuiyad

Chicken and Spinach Balti


Chicken & Spinach Balti
A deliciously tender chicken curry which is very simple to make – perfect for a mid-week meal!  Popeye would love this dish!
Serves 2
Prep time:  15 minutes plus up to 1 hour to marinade
Cooking time: 20 minutes

Ingredients
For the marinade
2.5cm/1in fresh ginger, peeled & finely chopped
2 cloves of garlic, peeled & finely chopped
1 lime, juice only
½ tsp ground coriander
½ tsp chilli powder
½ tsp ground cumin
½ tsp turmeric
1 pinch of salt
2 chicken breasts cut into bite-sized pieces
75ml/2 ½ fl oz natural yogurt

For the curry
1 tbsp vegetable oil
1 red onion, peeled & finely sliced
2 tomatoes, seeds removed & finely chopped
1 tbsp tomato puree
Splash of water
75ml/2 ½ fl oz double cream
150g/5oz baby spinach leaves

To serve
Small handful of fresh coriander, finely chopped
100g/3 ½ oz Basmati rice, cooked as per packet instructions

Method

1.  Place all the marinade ingredients into a bowl and mix thoroughly so that all the chicken is fully coated.  Cover the bowl with cling film and place in the refrigerator to marinate for at least 15 minutes but ideally 1 hour.

2.  For the curry, in a large pan heat the oil and fry the onions for 2-3 minutes until softened.  Add the tomatoes and tomato puree and gently cook for a further minute.

3.  Add the chicken including the marinade with a splash of water.  Pour in the cream and leave to simmer for 15 minutes until the chicken is fully cooked through.

4.  Add the spinach and mix through until it is fully wilted.

5.  Serve the curry with the rice and a sprinkling of coriander, enjoy!
reade more... Résuméabuiyad

Spinach and Goats Cheese Ravioli with Walnut Pesto and a Cream Sauce


Spinach and Goats Cheese Ravioli with Walnut Pesto and a Cream Sauce
This is a wonderfully delicious pasta dish which is perfect for any occasion.  It takes quite a bit of time to make but it is well worth it!!

Serves 4 starters 2 mains
Prep time:   1 hour 15 minutes
Cooking time: 20 minutes

Ingredients
For the pasta
340g/12 oz 00 pasta flour
12 eggs, yolks only
2 tbsp water
1 tbsp olive oil
1 good pinch of salt

For the filling
20g/ ¾ oz butter
200g/7 oz spinach
Salt & freshly ground pepper
350g/12 oz soft goats cheese
1 lemon, zest only

For the pesto
30g/1 oz walnuts
1 bunch of basil
1 garlic clove, peeled & chopped
30g/1 oz freshly grated parmesan
Olive oil

For the cream sauce
1 tbsp olive oil
1 shallot, peeled & finely chopped
500ml/16 fl oz double cream
1 lemon, juice only


Method

1.  For the pasta, pour the flour into a mound onto a flat surface and make a well in the centre. Add the egg yolks, olive oil, water & salt into the well and gradually mix with either a blunt knife or a folk. When the dough has become a thick paste use your hands to incorporate more of the flour.

2.  You can sieve any remaining flour and use the sifted flour while you knead the dough to stop it sticking to the surface and to your hands, but be careful not to make the dough too dry. Knead until well blended and the dough is soft and flexible. Don't worry if you haven't used up all the flour.

3.  Wrap the dough in cling film and place in the fridge for at least 1 hour.

4.  Meanwhile, make the filling by melting the butter in a pan and wilt the spinach, season with salt and pepper and squeeze out any water.  Place in a bowl with the goats cheese, lemon zest and season to taste.

5. For the pesto, toast the walnuts for 2-3 minutes in a dry frying pan.  Place into a small food processor with the basil, garlic and parmesan, blitz until you have a paste then loosen with olive oil.

6. For the cream sauce, sauté the shallots in a pan with the oil until softened.  Add the cream reducing slightly, add the lemon juice and season to taste. 

7. With a pasta machine roll out the pasta to the thinnest setting.  Place scoops of the filling onto one of the pasta sheets 5cm/2in apart.  Brush around the filling with a little water and top with another sheet of pasta.  With your fingers press around the filling to remove any air and then cut out the ravioli using a 5cm/2in fluted pastry cutter.

8.  Cook the ravioli in a pan of salted boiling water and cook for about 5 minutes.  Drain and serve on warmed plates with a drizzling of the pesto and cream sauce and a scattering of basil leaves for garnish, enjoy!
reade more... Résuméabuiyad

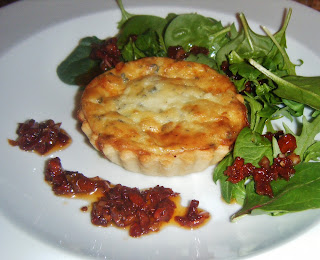
Blue Cheese and Caramelised Onion Tarts


Blue Cheese and Caramelised Onion Tarts
This is a wonderful starter which can prepare in advance.  Use your favourite creamy blue cheese to create this delicious dish.

Makes 4 Individual Tarts
Prep time:   15-20 minutes
Cooking time: 35 minutes

Ingredients
500g/1lb 2 oz ready-made short-crust pastry
250g/9 oz soft blue cheese, rind removed
90g/ 3 ¼ oz mascarpone cheese
2 large eggs, yolks only
1 sprig of thyme, leaves removed
175g/6oz caramelised onion relish/chutney
Freshly ground salt & pepper

For the Dressing
90g/3 ¼ oz sundried tomatoes from a jar, finely chopped
1 tbsp olive from the jar of sundried tomatoes
2 tbsp good quality balsamic vinegar
2 tbsp extra virgin olive oil
1 small garlic clove, peeled & crushed
1 small shallot, peeled & finely chopped

To serve
Salad leaves


Method

1.  Roll out the ready-made pastry and cut out 4 rounds 13cm/5in in diameter.  Use to line 4 individual tartlets about 10cm/4inches or a Yorkshire pudding/muffin tin.  Prick the base all over with a folk and place in the refrigerator for 20 minutes to let the pastry rest.

2.  Preheat the oven to 200°C/400°F/gas mark 6.

3.  For the best results blind bake the tartlets first.  Line the pastry case with foil and add the baking beans.  Place on a baking tray and place in the oven for 12-15 minutes, remove the foil and beans and bake for a further 5 minutes.

4.  In the meantime mix the blue cheese and mascarpone cheese with the egg yolks and thyme and then season to taste (be careful with the salt).

5.  Remove the tarts from the oven and reduce the heat to 180°C/350°F/gas mark 4.  Spoon 1 tbsp of caramelised onion into each tartlet and top with the cheese mixture.  Place in the oven for 15 minutes until the filling is set.

6.  In the meantime make the dressing, mix all the dressing ingredients together and season to taste.

7.  To serve, place the tarts on serving plates with salad leaves and drizzle with the dressing around each tart, enjoy!


reade more... Résuméabuiyad

Bailey's & White Chocolate Cheesecake


Bailey’s & White Chocolate Cheesecake
Now this is what I call a cheesecake – delicious!

Makes 10-12 slices
Prep time:   15-20 minutes
Cooking time: 45 minutes

Ingredients
For the base
250g/8 ½ oz shortbread biscuits
100g/3 ½ oz ground almonds
2 tsp ground ginger
75g/2 ½ oz butter, melted

For the filling
600g/21 oz cream cheese
200g/7 oz golden caster sugar
3 tbsp cornflour
2 eggs, beaten
150ml/5 fl oz whipping cream
150ml/5 fl oz Bailey’s
125g/4 ½ oz white chocolate, chopped


Method

1.  Preheat oven to 180°C/350°F/Gas mark 4.

2.  For the base, place the biscuits, almonds and ginger into a food processor and blitz until you have fine crumbs.  Mix in the melted butter and place in a greased round 22-24cm loose bottomed cake tin.  Press the biscuits well into the tin and place in the refrigerator.

3.  For the filling, place the cream cheese, sugar and cornflour into a food processor and blend.  Add the eggs, cream, bailey’s and beat until you have a smooth mixture.  Stir in the white chocolate.

4.  Pour the mixture into the tin and place in a roasting tray filled with 1-2 cm of hot water.  Place in the oven for 45 minutes or until lightly golden and the filling is set.

5.  Remove from the oven and allow to cool before removing from the tin.  Enjoy!
reade more... Résuméabuiyad

Braised Beef with Gentleman’s Relish


Braised Beef with Gentleman’s Relish
A wonderfully delicious satisfying meal, perfect for a winters evening!  The gentleman’s relish compliments this dish perfectly.
Serves 4
Prep time:   10 minutes
Cooking time: 1 hour 45 minutes

Ingredients
500g/17 ½ oz stewing steak
50g/2 oz plain flour
1 tbsp olive oil
1 onion, peeled & sliced
2 celery stalks, chopped
2 carrots, peeled & chopped
225g/8 fl oz red wine
1 litre/ 1 ¾ pints beef stock
Freshly ground salt & pepper

For the Gentleman’s Relish
150g/5 oz salted anchovy fillets
250g/9 oz butter
½ cayenne pepper
½ tsp ground nutmeg
½ tsp ground cinnamon
Freshly ground black pepper
½ lemon, juice only
1 tbsp Worcestershire sauce
½ clove garlic, peeled

To serve
Buttery mashed potato


Method

1.  Dredge the stewing steak with the flour then heat the oil in a large casserole dish.  Fry the meat in the dish until browned all over and remove with a slotted spoon, you may have to do this in batches.

2.  Add the vegetables and fry for 2-3 minutes then pour in the red wine; use a wooden spoon to scrape off all the browned bits.

3.  Add the stock to the dish and bring to the boil, return the meat back to the dish.  Reduce the heat to a simmer and cook for 1 ½ hours until the meat is tender, season to taste.

4.  To make the Gentleman’s relish, place all the ingredients into a food processor and blend.  Spoon the butter onto a large piece of cling film and roll up into a large sausage and place into the fridge to chill.

5.  Serve the braised beef with a slice of Gentleman’s relish and some buttery mash, enjoy!

reade more... Résuméabuiyad

Signs of Spring

photo of my flowers taken by my dear friend Jennifer Yandle

Michael sent me flours (ha... how a baker thinks!) flowers this week. The rosy pink and crisp white colors made me smile. I feel blessed and happy.

But not just because of the flowers. So much has happened in my life in the past year. I never really wrote a "goals" post for 2012, because honestly life is different. Life is happier. More at ease.

Happier not because of book deals, weight loss (I think overall I only lost around 2 pounds last year... I've gained back much of what I lost), or the lovely pendant my husband bought me for Valentine's Day.

Happier because I'm learning to be comfortable in my own skin. I'm learning to accept my flaws and change what I can in my own way with my own sense of timing.

I didn't write goals not because I don't have them, or want them... but because my goals are more loving and less concrete. I want to continue my journey of health, I want to continue to strengthen my spiritual life and emotional health. Physical health will come, but I've learned that right now focusing on my emotional and mental health has become a primary goal.

And I like who I have become. I'm not ashamed to admit that I like my size 20 khakis or my 2x teal tunic shirt with pleats. They fit me well and they fit my personality. I like that.

I think one of the biggest pieces of becoming healthy has been to start loving the person I already am. Right now. Yes, I want to become healthier physically... but for me, I was so focused on loving and wanting the person that MIGHT become "me" one day, that I had a really hard time accepting the "me" of now.

So here I am. In the midst of an extremely busy time. I have ten days to finish my book and turn it in. Ten days to edit all of my chapters, write a few more, write an introduction. Yet, while this would normally be a time of immense stress and frustration, I feel incredibly at ease. This is truly a sign of growth and change for me. I will finish this book well! I know that. (I'm not sure I could have said that 6 months ago!) Though it may be a few long nights and a more than a few cups of coffee, I will finish this race. And I will have learned to not only love myself more but how to deal with immense stress a little bit better. And that is progress.

A mantra that I wrote from a post earlier last year still rings true for me today: I am breathing, I am blessed, and I am strong!

My dear friend Cheryl sent me a poem earlier this week and I wanted to share it. I can truly relate to the themes in this poem and how for me, while the grip is often tight, change can happen -- slowly, but surely.

Open Hand
by: Gordon Yaswen

When your hand releases
a tool carried long,

you unclench it gradual,
...or it hurts.
Eyes used to dark
need time to take light,
and many-miled feet 
are un-booted slow.
When at length you unshoulder
from your back a burden,
you straighten by degrees;
and for the war-weary,
battles aren't over
when safety is reached.


I see better now
why I stall my growth,
as I heal, each inch;
why steps seen before
I only now take.
to go forward
I must also stop;
I can't depart the darkness
all at once.
To un-stoop, squint, clench;
open heart, hands, eyes;
I can slowly step,
tho seldom leap.


But, after all,
journeys so worth taking
are worth taking slow.
            
reade more... Résuméabuiyad

Beef Madras


Beef Madras
A great British favourite – this curry is full of spice with melt in the mouth beef!

Serves 4 small portions, 2 large
Prep time:   20 minutes
Cooking time: 105 minutes

Ingredients
1 cinnamon stick, 2.5cm
10 green cardamom pods
8 cloves
10 black peppercorns
2 tsp cumin seeds
1 tbsp coriander seeds
6 dried Kashmiri chillies, seeds shaken out
2½ tbsp vegetable oil
1 onion, sliced
½ tsp turmeric
1 tsp garam masala
1 pinch of salt
500g/17 ½ oz diced beef/stewing steak
2.5 cm fresh root ginger, peeled
7 garlic cloves, peeled
2 tomatoes
4 whole green chillies, pierced

To serve
4 tbsp single cream
1 handful fresh coriander, chopped
Basmati rice or Indian breads


Method

1.  Place the cinnamon, cardamom, cloves, peppercorns, cumin and Kashmiri chillies into a spice grinder or pestle & mortar, grind until you have a fine powder.

2.  Heat the oil in a large pan, add the onions and cook on a gentle heat until softened.  Stir in the ground spices with the turmeric, garam masala, salt and a splash of water.  Cook for 1 minute.

3.  Add the beef and fully coat with the spices, cook until browned all over.

4.  In a small food processor blend the ginger, garlic, tomatoes with a splash of water until you have a smooth puree.  Add the mixture and green chillies to the beef, bring to the boil.  Reduce the heat and simmer until all the sauce has almost been absorbed into the beef.

5.  Pour in enough water to cover the beef curry, bring to the boil, cover and reduce to a simmer.  Cook until the beef is tender, around 1 ¼ hours.

6.  Uncover and simmer until you have a thick sauce, season to taste.  Serve the curry with a drizzle of cream, a sprinkling of fresh coriander, basmati rice or Indian breads, enjoy!
reade more... Résuméabuiyad

The Grain/Dairy Free B-Day Smash Cake!


Photo by the Urban Poser


Recently, I was commissioned to make a grain/dairy/sugar free birthday 'smash' cake for the most beautiful little girl on the planet! Call me superficial, but I believe that beautiful little girls deserve beautiful little cakes. Ok, if I'm totally honest, I think EVERYONE deserves beautiful cakes!


But making a grain/dairy/sugar free cake that looks fabulous
reade more... Résuméabuiyad

My Favorite Waffles

Make these waffles in any type of waffle maker. 
Thick Belgian-style or thinner shaped waffles, like
my heart shaped waffle maker...they are all good. 
Serve with fresh strawberries and powdered sugar
 or warmed maple syrup....or both.
 Mix up the batter and let rest. 
 Spray and preheat a waffle iron.
Pour 1/3 C batter into the center. 
Close and bake until golden.
Keep waffles warm in the oven, along with your 
plates while you bake the rest.
One of the things I love about waffles is that 
unlike pancakes they freeze beautifully.
I always make the full recipe.
Then I can just pop them in the toaster oven to
reheat and enjoy again.

My Favorite Waffles
2 C flour
2 T sugar
1 T baking powder
1/4 t salt
Whisk together in a large bowl. 
~~~~~~~~~~
2 egg yolks
1-3/4 C milk
6 T butter, melted
Whisk together in another bowl, 
then combine with the flour mixture.
~~~~~~~~~
2 beaten egg whites
Fold into the combined batter. 
Let stand 20-30 minutes.

Pour 1/3 C batter in the center of sprayed and 
preheated waffle iron. Close lid and bake until
 golden, about 2-3 minutes.
Remove and keep warm on a plate in the oven, 
along with your plates while you make the
 rest. Freeze any leftover waffles and use 
a toaster oven to reheat again.
(tip: If you are in a hurry and do not want
to separate the eggs, you can just beat 
the whole eggs until frothy and proceed) 
Makes 10 waffles.


Enjoy!


reade more... Résuméabuiyad

Spaghetti Puttanesca


Spaghetti Puttanesca
This is a wonderfully tasty quick and easy mid-week meal. Chilli, Capers, Anchovies, Olives and Tomatoes - what a perfect combination!

Serves 4
Prep time:   5 -10 minutes
Cooking time: 15 minutes

Ingredients
2-3 tbsp olive oil
2 garlic cloves, peeled & finely chopped
1 small red chilli, deseeded & finely chopped
6-8 anchovies from a jar, drained & finely chopped
115g/4 oz black olives, pitted & halved
2 tbsp capers, drained
400g/14 oz tin of chopped tomatoes

To serve
450g/1lb dried spaghetti, cooked as per packet instructions
Freshly grated parmesan
Fresh parsley, chopped

Method

1.  Place the oil in a large frying pan and heat, add the garlic and chilli and gently cook for 2 minutes.  Add the anchovies, olives, capers and tomatoes. Bring to the boil and reduce the heat to a simmer for 10-15 minutes until the sauce has thickened.

2.  Add the cooked spaghetti to the sauce and toss until fully coated.

3.  Serve with a sprinkling of parsley and parmesan, enjoy!

Cooks Tips

·         Try adding some raw peeled prawns to the sauce 5 minutes before serving.


reade more... Résuméabuiyad

Open Your Heart: Partner Yoga With Your Kids


Open your hearts this Valentines Day! Try these heart opening asanas with your kids or even that special someone. Don't worry if you can't do them perfectly...the real heart opener is the time spent with your loved ones.


reade more... Résuméabuiyad

Gluten Free, Dye Free Red Velvet Cake Recipe


(Hello, my friends! Valentine's Day is tomorrow and I wanted to re-post one of my favorite recipes from GLG! It deserves a little more attention than it initially received in 2008 (wow, 4 years ago!), especially on Valentine's Day! This is a gluten free and DYE-free red velvet cake... it's just as delicious as the dye filled version and it's been a hit with my co-workers today! I hope you'll enjoy it this February. I've also included new notes in at the end of this recipe to make it a bit simpler, along with now being dairy free. I promise you'll love this easy, classic cake! -- Carrie) 

A few weeks ago my co-worker Jennifer was telling me about a brownie that her husband brought home. He picked up the brownie at a bakery near his work and it was called a "Red Velvet Brownie." The brownie itself was chocolate, but it was laced with red velvet cake squares swirled throughout the batter and topped with cream cheese icing. I was drooling.

Jennifer and I searched and searched for a recipe that might be similar to this brownie. We gave up. I couldn't find one that mimicked the brownie she had.

In 2009 I made mini-red velvet cupcakes for Valentine's Day. I thought these cupcakes were okay, yet I hated using all of the food coloring required for the recipe. SO, I decided to look for different red velvet cake options!

I finally read several recipes that gave a possible alternative to food coloring. These recipes stated that *originally* red wine vinegar or red beet juice was added to the standard buttermilk , cocoa, and baking soda recipe and a chemical reaction occurred during baking which gave the cake a reddish hue. Not food coloring red... just a reddish overtone.

That was good enough for me.

I converted the recipe to be gluten free, lower fat, and lower sugar and gave it a try.

It was worth the try. I LOVE this cake. It's light, yet decadent. Stays moist and fluffy, and has every bit of that delicious red velvet flavor of it's "food-coloring laden" predecessors.

I will post better pictures of this cake this weekend because I'm going to make it again for a dinner we are having.

I've included a halved recipe in the printable PDF in case you would only like to make one layer, as I did originally. It makes a lovely single layer cake. I think this would be perfect for tea parties!

Gluten Free. Food-Coloring Free. Soy Free. Lower fat. Lower sugar. Red Velvet Cake.

I do recommend using a high quality cocoa powder that is NOT dutch processed for this cake.


Gluten Free, Dye Free Red Velvet Cake with Cream Cheese Icing
Created by Carrie Forbes of Gingerlemongirl.com
Free of gluten, soy, and dyes
(Printer-friendly version)

Wet Ingredients
1/2 cup melted butter -or- canola oil
1/2 cup applesauce
1/2 cup water
1/2 cup good quality cocoa powder (NOT dutch processed)
2 extra-large eggs
1 tablespoon vanilla
1 cup buttermilk
1 1/2 teaspoons baking soda
2 tablespoons red wine vinegar -OR- 2 tablespoons red beet juice

Dry Ingredients
1 cup brown rice flour
1/2 cup sorghum flour
1/2 cup tapioca flour -or- sweet rice flour
1/2 cup cornstarch
1/2 teaspoon xanthan gum
1 teaspoon salt
1 1/2 cups granulated sugar

Directions:
Preheat the oven to 375 degrees. Grease 2 9-inch round cake pans. (I lined my pan with parchment paper and then spritzed it with non-stick cooking spray.) Mix melted butter with applesauce, water, and cocoa powder. Set aside. In a medium sized bowl or your mixer, beat eggs. Add vanilla, buttermilk, baking soda, red wine vinegar -or- beet juice. Add butter/cocoa mixture to egg mixture. Set aside. In a large mixing bowl whisk together all dry ingredients. Fold the wet mixture into the dry ingredients and mix thoroughly. Batter will be thin and a very light brown. Pour batter into prepared cake pans and bake for 18-20 minutes until a toothpick inserted into center comes out clean. Let cakes cool completely before frosting.


UPDATED RECIPE NOTES:
  • DAIRY FREE/CASEIN FREE: Use coconut oil for the butter called for and in place of the buttermilk use 1 cup full-fat coconut milk + 2 tablespoons lemon juice
  • STARCH SUBSTITUTES: Since I no longer use tapioca flour/starch OR cornstarch, I simply used 1 cup of arrowroot starch in place of the cornstarch & tapioca flour called for. 
  • WET ING/DRY ING: When I made this cake yesterday instead of adding the cocoa & baking soda to the wet ingredients, I simply added them to the dry ingredients instead... it worked fine! 
  • DAIRY FREE ICING: Pillsbury frostings are gluten free and dairy free. I used plain vanilla Pillsbury frosting for these. For a homemade dairy free icing, try this recipe: http://www.godairyfree.org/Recipes/Dairy-Free-Desserts/Butter-Cream-Frosting-Vegan-Gluten-Free.html (use the dairy-free milk of your choice, you don't have to use soy milk.) 
  • CUPCAKES: I made 24 cupcakes from this full recipe last night. Baked at 350 for about 17 minutes. 


Cream Cheese Icing from Allrecipes.com, submitted by Janni

Whole Recipe
2 (8 oz.) packages cream cheese, softened
1/2 cup butter, softened
2 cups confectioners' sugar
1 teaspoon vanilla extract

1/4 Recipe (I used this to frost a single layer red velvet cake)
4 oz. cream cheese
2 tablespoons butter
1/2 cup confectioners' sugar
1/4 teaspoon vanilla extract

Directions:
In a medium sized bowl mix together cream cheese and butter, until smooth and creamy. Mix in vanilla and gradually add confectioners' sugar. Frost as desired on cake and store leftovers in fridge.

reade more... Résuméabuiyad